To accomplish a great project, the DIY project requires the best rendering tools. Australian Rendering Company, with 30 years of experience. They provide professional rendering solutions throughout Melbourne such as acrylic, cement, cladding and much more.
The right tools are crucial for a pristine finish and wearing strength. Power tools are crucial for effective DIY projects, industry sources says.
When they do it themselves and have the right rendering tools, DIYers can achieve a clean, hard-wearing finish. Australian Rendering Company provides a 7 year guarantee. For domestic services, call 0468 745 610 or email contact@australianrenderingcompany.com.

Basics of Mirrors for DIY’s
The basics before you start a DIY rendering project. Undertaking/rendering/ is the key while construction, renovation of all kinds of projects. It provides both protection and visual appeal to walls.
What Is Rendering And What Are The Benefits?
Rendering refers to the layer of material such as cement or acrylic applied to the surface. It prolongs the life of walls, makes them appear better and better resists weather. Good rendering can make a building look better, and last longer.
Popular Rendering Styles for Australian homes
- First things first, what actually is a render?
Australian houses can be found with different styles of rendering. And each comes with its own features and uses.
Acrylic Rendering
Acrylic rendering is popular since it does not crack, and because it is water resistant. It’s perfect for spaces that get a lot of movement.
Cement Rendering
Cement rendering has strength and durability. It’s often used outside.
Concrete Render Finishes
Concrete render finishes can be employed in various textures and styles. They are flexible and good for both indoor and outdoor projects.
Equipment for Ensuring Proper Rendering of Your Meat
Preparation is key to a great render. The right tools are a must. You have to be sure to prep your surface properly and be accurate with your measurements for a great outcome!
Surface Preparation Equipment
Proper surface prep is key to a strong bond. And having the right tools makes this easier and faster.
- Scrapers and Wire Brushes
Scrapers and wire brushes remove film from surfaces. They clear the dirt and old render, creating a clean base on which to apply new render. - Pressure Washers
Power Wash/Auto Leach will deep clean surfaces. They are good for big or soiled areas.
Measuring and Marking Tools
The above measurements and correct marks are the key to a pro finish. The proper tools are involved in the process of when render can be applied evenly and properly.
- Levels and Straight Edges
Levels and straight edges keep surfaces in line. They prevent irregularities and imperfections. - Chalk Lines and Markers
Text lines and markers identify areas of render. They oversee the work so that it is done properly.
For DIYers, you can get a pretty render if you have the right tools. Scrapers, wire brushes, and pressure washers are essential tools for prep. And so level, straight edge, chalk line and measuring and marking.
Best DIY Enthusiast Rendering Tools
Those who like to do it themselves need the right tools for rendering: It’s good to have the right tools for professional results. It’s not just the materials but also the tools that are used.
Essential Hand Tools
As important, hand tools are crucial in DIY rendering. They give you control and precision so you get a super smooth finish.
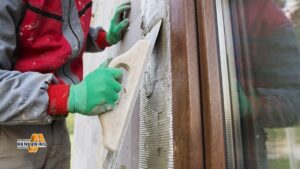
- Trowels and Floats
Trowels and floats are essential. Trowels put the render on, and floats take the render off. - Hawk Boards and Plastering Rules
These hawk is furnished with rendering per easy application. Rules in plastering assist for straightness and in getting a level surface.
Basic Mixing Equipment
The clue to a good render is good mixing. You’ll need:
- Buckets and Mixing Drills
Render buckets and mixing drills help to mix well. It’s crucial to have the right drill attachment. - Render Mixers and Paddles
It makes mixing easier with render mixers and paddles. They facilitate the even blending of large quantities.
If you want to be successful, you will want to work with the best rendering tools for home projects. Understanding the purpose of each tool will give the best results.
Professional Performance Cartridge for Easy Installation
When we’re talking about professionals who want top quality finishes, the finish of professional rendering tools is a must. Better to choose the right gear to improve efficiency and accuracy.
Power Tools for Efficiency
Rendering with power tools is quicker and more efficient because such tools greatly reduce the amount of hand work. Necessary tools include render spray machines and power sander and grinders.
- Render Spray Machines
Render Sprayer Machines Render spray machines make light work of applying render – they save time and back-breaking effort. Great for larger projects. - Power Sanders and Grinders
Sanders and grinders are also necessary for a polished finish. They come in different sizes and are for use at the various stages in producing a rendering.
Specialized Finishing Tools
He recently started using specialized tools to give the project its final flourish and extra sturdiness. Key tools are texture rollers and brushes —and decorative stamps and moulds.
- Texture Rollers and Brushes
Texture rollers and brushes are used to produce an exclusive texture and pattern. They are a flexible and creative way to get the effect you want. - Decorative Stamps and Moulds
Ornamental seals and dies detail touches and patterns. They’re the silver, gold and bronze of stand-out, crowd-pleasing finishes.
Production people can see the quality of their renders improve, productivity increase, and reduce labor costs with advanced rendering tools. The right tools can allow service professionals to exceed client expectations.
| Tool Type | Description | Benefits |
|---|---|---|
| Render Spray Machines | 2) Apply render fast and even | Saves time, reduces labor |
| Power Sanders and Grinders | Smooth out surfaces | Flawless finish, versatile |
| Texture Rollers and Brushes | Make all sorts of textures and designs | Flexible, creative finishes |
| Decorative Stamps and Moulds | And then more details and designs | As-tique, which retails for between $45 and $50 per square foot, was rolled out in 11 colors. |
Rendering Safety Gear when doing it Yourself
Safety products Ensure you protect yourself when DIY rendering with safety equipment. This job involves working with hazardous materials and tools. So, it’s crucial to have safety measures in place to prevent accidents and injuries.
Personal Protective Gear
Personal protective equipment is crucial for protection against render hazards. This includes:
- Protective Leave and Eye Protection
If you prefer, wear respiratory mask and safety goggles to prevent breathing in dust and debris. They also shield your eyes from splashes and debris. - Gloves and Coveralls
Tough gloves and protective clothing prevent skin irritation and injury. They shield you from sharp objects and rough terrain.
Workspace Safety Essentials
And it’s equally important to maintain a safe work environment. This means:
- Drop Sheets and Maskwork Materials
Drop sheets and masking tape help keep mess to a minimum. They also prevent other parts from being damaged. - First Aid Supplies
Key, of course, is having first aid supplies on hand. They aid in the prompt treatment of small injuries.
| Safety Equipment | Purpose |
|---|---|
| Respiratory Masks | Prevent the indoor Dust and debris that will be exposed to breathe sootprevent the high temperature of soot from entering the room and affecting the bodygrown content includes: 1 x mask (including filter) |
| Safety Goggles | Face shield prevents splashes, drops, and dust from getting in the eyes |
| Durable Gloves | Not damage on sensitive skin and reduce harm EnumerableStream: Block ultraviolet more effectively |
| Drop Sheets | Hold the mess and protect surfaces |
By prioritizing safety and working with the proper equipment, rendering projects can be done safely and well.
Tools for Distinct Render Dockables
Alberti and Cicero, Valerio Olgiati and Tatlin and the constructivists, because to get professional results you need a specific tool for every rendering you do. Many methods require special tools for a slick finish.
Acrylic Rendering Tools
Exterior work: Prefer Acrylic rendering is used for outdoor, it is flexible in nature and long life. Key is having the right tools for the smoothest job.
Cement Rendering Equipment
Cement rendering is an age-old technique, and you require robust tools to carry it out.
Equipment Used for Polystyrene or Hebel Cladding
Preparation and finishing of polystyrene and Hebel cladding require special equipment.
| Rendering Type | Primary Tools | Function |
|---|---|---|
| Acrylic Rendering | Plastic Trowels, A sponge float | Application and Texturing |
| Cement Rendering | Steel Trowels, Darby Tools | Smoothing and Leveling |
| Polystyrene and Hebel Exterior walling | Specialty Rasps, Adhesive Applicators | Preparation of the Surface and Application of the Adhesives |
Tools for the Maintenance and Cleaning of Rendering Equipment
Maintaining good condition in your rendering equipment is crucial if you want to achieve great DIY results. Taking care of you tools will make them last longer and work better.
Cleaning Essentials
Cleaning your rendering gear properly is step one. Select the correct cleaning detergents and scrubbers and remove tough render residue.
- Solvents and Scrubbing Devices
Choose cleaning solutions that will not damage your tools. A scrub brush with hard bristles is ideal for getting the dried render off the walls. - Water Management Tools
A cleaning staple are tools such as buckets and hoses with spray nozzles. They’re there to regulate water flow and pressure, which makes for easier cleaning.
Tool Maintenance Equipment
Maintain Keep your tools in good order after you have cleaned them. And that involves storing them correctly and ensuring they function properly.
- Storage Solutions
Pick up storage solutions such as toolboxes and wall racks. They are great in keeping your rendering gear in place and protecting against damaging, scratches, and dust. - Sharpening and Repair Tools
Maintain your cutting implements and inspect your gear to see if it has become worn. When you have tools at hand, you can make repairs quickly, which is a time saver.
You can make your tools last longer by cleaning and maintaining them, and this is also a way to save the planet. It saves you money and gets that DIY project to look how you envisioned it.
Investing Your Time and Money in the Right Tools for Rendering
Selecting the right rendering tools is crucial if you want excellent DIY rendering results. The proper tools improve the quality of your finish, speed up the work and reduce mistakes.
Consider what your project requires when selecting tools. Power tools are necessary for big jobs. For little jobs, all you need are a few hand tools. By understanding what your project requires, you can choose the right project tools.
High-quality power tools can make a big difference in do-it-yourself projects, experts say. The proper tools will result in a better finish and a more seamless process.
To be effective in your toolkit investment, think about what you’re doing and what tools are available. This means you get professional results and enjoy your DIY work more.
What are the best rendering tools for your DIY project?
You will need basic tools, like trowels and floats, for D.I.Y. projects. Also necessary are hawk boards and plastering rules. Don’t overlook gear for mixing, including buckets and paddles.
What do I need to get to successfully render?
You will want some tools for surface prep: scrapers and wire brushes. And they are also essential to pressure washers. For measurement and marking, levels and straight edges are your best friends. Chalk and marking instruments are also essential.
What are the safety precautions or gears needed for DIY rendering projects?
Safety is a must. Dress in protective gear such as gloves and eye protection. And keep drop sheets and first aid materials at the ready.
What are some of the essential tools needed for different rendering work?
All apps require some tools that are must-have. For acrylic, substitute plastic trowels and sponge floats. Steel trowels and darby tools are ideal for concrete. For polystyrene and Hebel, you’ll require rasps and specialist applicators.
How do I care for and clean my render equipment?
Keep your tools clean with cleanses and scrubs. Use also water management tools. Be prepared for upkeep, having resources for storage and sharpening.
Why should you invest in solid rendering tools?
Better tools equals better results on your project! They also minimize the risk of accidents and prolong the life of tools.
What great rendering tools can be used to create pro-level work?
Advanced tools such as render spray machines should be employed for a professional job. Sanders and Grinders Power sanders and grinders are also helpful. Specialized finishing tools, such as texture rollers, can make a world of difference.
What Are The Different Rendering Types Used In Australian Homes?
Acrylic, cement and concrete renders are used in Australian homes. They each have a purpose and a look.
The significance of appropriate surface preparation in rendering?
The key to a quality render is good surface prep. It provides a clean and smooth surface for the render to adhere to.
How do I select the right rendering tools for my DIY project?
Choose the proper tools by considering your project’s requirements. Think about the style of render, surface prep and finish you require.